Showing posts with label digital camera. Show all posts

Tuesday, January 28, 2014

More Tips on Taking GREAT Winter Photographs

10 Tips For Taking Great Winter Pictures When Your Subject Is Surrounded By Snow

Typically, when you use your camera’s “auto” setting to take pictures outdoors in wintry snow conditions, the pictures will come out too dark.
All that white snow messes with your camera’s internal “exposure” settings.
To avoid drab, gray winter pictures, and get the brightest, crispest photos with the brightest colors in snowy conditions, try these simple steps:
lynnette-darla-snow-skiing

How To Take Great Winter Pictures

#1. 
If it snowed overnight, then take some shots very early in the morning, before the sun’s light becomes too bright. This way, the lights will be softer, the colors will be truer, and the snow will be fresher, and still untouched. Shots taken very early or late in the day will result in warmer photos with the snow taking on reddish hues. If you shoot midday, you’ll get much cooler, bluer photos.
Winter snow photo (c)BigFoto.

#2.  Most of today’s cameras (digital and film) have a way to change the “exposure compensation”. If you set the control to +1, it will overexpose the scene by one stop, admitting twice as much light into the photo.

#3.  First focus your camera on a darker object, then press the shutter down halfway so it meters the dark object instead of the snow. Then, without lifting your finger, re-frame your photo to the shot you actually want, and depress the shutter button the rest of the way down to take the picture.

#4.  You should do this any time you’re taking pictures, but its even more important with winter outdoor photography… Make sure the sun is on the right or left side of your subject during morning and evening hours and directly behind you when it’s high in the sky. You should never shoot into the direction of the sun.

Leaves with ice on them photo (c) BigFoto.com
#5.  To photograph frost-covered branches, snow resting on a pinecone or mailbox, or the family pet with a face-full of snow… move in close to eliminate much of the background and use your camera’s “macro/close-up” mode.

#6.  To photograph ice skaters, sledders, snowmobilers, snow shovelers, skiers, etc… all of whom are “on the go”, you’ll want to use your camera’s “action” setting

#7.  If it’s sunny outside, turn on your camera’s “fill flash” and get as close to your subject as possible. (This lightens facial shadows by reducing the amount of white background in your picture, so your camera’s automatic metering will be more accurate.)

Winter snow picture that's too dark. Winter snow picture that's brighter thanks to using the flash.

#8.  Another fun technique for action shots is to “prefocus” (or lock the focus) on a spot in the path of someone in action. Then, just as your subject reaches that spot, depress the shutter the rest of the way down, effectively freezing them in action!
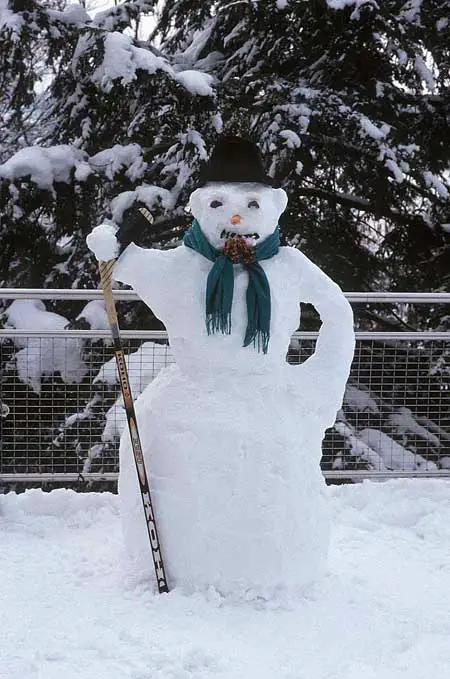
Snowman photo (c)BigFoto.com.

#9.  To photograph a snowman, kneel down to get a low angle and shoot up toward the snowman. This will make the snowman seem tall and mighty.

#10.  While completely snow-covered scenes can be beautiful, try to compose a few shots around something that’s noticeably colorful. Any object placed in the foreground or middle of your shot that’s not white, gray or black will add life to your photo.


Lynnette Walczak

I like to help people find unique ways to do things in order to save time & money -- so I frequently write about "outside the box" ideas that most wouldn't think of. As a lifelong dog owner, I often share my best tips for living with and training dogs. I worked in Higher Ed several years until switching gears to pursue things I was more passionate about. I've worked at a vet, in a photo lab, and at a zoo -- to name a few. I enjoy the outdoors via bicycle, motorcycle, Jeep, or RV. You can always find me at the corner of Good News & Fun Times as publisher of The Fun Times Guide (32 fun websites).
Doesn't look like winter is going to leave us anytime soon!

Enjoy the beautiful, but frigid weather and capture beautiful photos!

Appleberry Photography
Visit our online store!
Appleberry Photography

Tuesday, September 3, 2013

5 Tips on Taking Fantastic Autumn Photographs

First day of school here in Michigan!  And the weather is cooperating!  About 70 degrees and partly sunny!  The days are getting shorter!  Soon the tr ees will begin to turn into the awesome shades of red, yellow, and maroon!  Are you ready???

Here is a wonderful article on taking fabulous autumn photographs!

By Ian Plant

Make a Mirror Reflection

Round Pond, Adirondack State Park, New York
Tripod-mounted K.B. Canham DLC45 view camera with 150mm f/5.6 Rodenstock Apo-Sironar- N lens; 2 sec at f/22 on Fujichrome Velvia 50.

Windless conditions are critical for achieving mirror-like reflections of autumn color in water. But an uninterrupted mirror can create too static a picture. Instead, look for rocks or logs in the water to break up the reflection and to provide a visual anchor to help strengthen your composition.

Another key factor: the angle of the light. I made this photo at sunrise, when first light started to strike the peak autumn color. Plan to be on location for sunrise and sunset to capture moody autumn shots—midday sunny weather won’t provide nearly as much drama.

Don’t worry, though, if you don’t have ideal weather every day. Fall often brings cool and moist conditions— a magical recipe for fog, morning dew, and striking sunsets and sunrises. I love it when so-called bad weather moves in, as unstable weather can often result in the most photogenic conditions.

And don’t stop shooting when peak color fades. Sometimes you can make the best photographs when the trees stand bare and fallen leaves carpet the forest floor. You'll find poignant images in a mostly bare tree with just a few lone leaves still clinging to the branches.

Post-peak also offers a great time for you to look for scenes of streams and waterfalls with rocks covered with leaves.

If an early snow or frost comes your way, you can also show the transition between autumn and winter. Tip 2: Capture Color Combinations

Aspens, Acadia National Park, Maine
Handheld Canon EOS 5D Mark II with 17– 40mm f/4L Canon EF lens; 1/160 sec at f/16, ISO 400.


Everyone loves bold autumn color juxtaposed with a brilliant blue sky. Frame the most vibrant sunlit reds and yellows against the sky to create the strongest color scheme; including a few puffy, white clouds can’t hurt, either.

For the photo above, I pointed my wide-angle lens up for this dizzying view of aspen trees. The sun was included for compositional interest, and a small aperture was used to create a sun star.

You can use a polarizing filter to darken skies and increase contrast with clouds. (I did not use a polarizer here, as the camera was at the wrong angle to the sun and, with this wide a lens, the sky would’ve been darkened unevenly.)

Blue sky, though, is not the ideal lighting for other types of scenes. Overcast light often works best for streams and waterfalls, as in the shot below, and a little bit of drizzle can really help to saturate autumn colors. In situations like this, a polarizer, by reducing reflections and cutting through glare, strongly enhances color.

Polarizers also act as neutral-density filters, reducing light without shifting color, which allows me to use a longer shutter speeds.

It’s never been easier to ID the right place and time for peak autumn color. The Weather Channel (www.weather.com/activities/driving/ fallfoliage), Foliage Network (foliage network.com), and other websites let you monitor fall color progression. A number of sites are dedicated to specific areas of the country—do a search for yours. Watch out: Color peaks earlier at higher elevations, and this may not always be reflected in online reports.

Tip 3: Scatter Leaves

Second Falls of Cedar Run, Shenandoah National Park, VA
Tripod-mounted K.B. Canham DLC45 view camera with 90mm f/4.5 Nikon Nikkor SW lens and polarizer; 8 sec at f/32 on Kodak Ektachrome 100VS film.


Autumn is one of my favorite times to shoot because it’s one of the few times I’m not completely at the mercy of the landscape and the light. As I hike along a trail, I like to gather fallen leaves, looking for the most colorful. When I arrive at my shooting location, I strategically scatter them in order to enhance the scene.

This works particularly well for waterfalls and streams (sprinkle rocks with color), and intimate still lifes (add a splash of leaves to a shot of bracken ferns). Just make sure that your scattering looks natural—too many leaves facing color-side up are a dead giveaway that the scene has been arranged.Tip 4: Isolate Colors and Detail

Ausable River, Adirondack State Park
Tripod-mounted K.B. Canham DLC45 view camera with 450mm f/9 Nikon Nikkor-M lens; 4 sec at f/45 on Kodak Ektachrome 100VS film.


create compelling images by photographing autumn color­—but not the trees—reflected in water. In the photo above, the foliage of the trees on the opposite bank was sunlit; the water, was in shadow, so I was able to create color contrast between the warm tones and the rocks lit by cooler light from the blue sky.

For an even more impressionistic effect, photograph reflections in blurred moving water, such as a fast-flowing brook or mountain stream, or rippled lake water on a breezy day. Experiment with exposures of 1/2 sec or longer to capture a pleasing amount of motion blur. Don’t go too long, though, to avoid smoothing out the water and reflections too much. Zoom in with a telephoto lens to exclude all but the most colorful reflections in the water; rapids and boulders can help enhance the scene.

When photographing reflections, a polarizing filter can help to bring out the colors if you dial it up only slightly—a little bit of polarization can enhance the scene, but too much can reduce or eliminate reflections.

While you’re zooming, look for intimate still-life images. A 70–200mm lens (for full frame) is perfect for such scenes. I like to capture the details that help tell the story of the changing of the seasons. Look to zero in on a distant autumn hillside, dew-covered leaves carpeting the forest floor, or just a dash of fall color reflected in a still lake.

Don’t focus all your efforts on trees—plenty of other flora, such as ferns, blueberry bushes, and other ground plants, take on autumn hues. Pattern photos of bracken ferns are an autumn classic; ripening berries are also another cue that fall is in the air.Tip 5: Create Fall Abstracts

Tree trunks, Adirondack State Park
Handheld Canon EOS 5D with Sigma 50–500mm f/4.5–6.3 DG OS lens and polarizer; 1/2 sec at f/32, ISO 50.


This season is a great time for making impressionistic motion-blurred images. Although wind often creates problems when photographing autumn foliage, you can use it to your advantage. So if it starts to blow too hard for sharp shots, switch gears and go for motion blur.

Look to take photos of wind-blown foliage using long exposures of 1/2 sec or more. Such images usually work best if some portion of the scene remains stationary, such as a solid tree trunk surrounded by wind-blown autumn foliage. Use a tripod to ensure that stationary objects are rendered sharp in your photo during the long exposure.

No wind? Try creating your own motion blur by moving the camera during a long exposure to create interesting abstract blurs, as I did in the image above, where I swiped my camera vertically. This technique works well when photographing forest scenes with lots of color. About 1/2 sec to 2 sec of exposure time usually works best with this technique.

Great Places to Shoot

Green Mountains, VT: This pleasant mix of quaint rolling farmland and hillsides covered with brilliant red maples always makes the top of everyone’s fall color list.
White Mountains, NH: Don’t miss the Kancamagus Scenic Byway, which cuts
through some of the most dramatic autumn scenery in the mountains. Adirondack Mountains, NY: The Lake Placid region has stunning mountain scenery, and countless alpine lakes and brooks make for perfect reflection photos.
Acadia National Park, ME: Famous for its rocky coast, this is leaf-peeping paradise, with red blueberry heath atop Cadillac Mountain and maple forests below.
Lake Superior, MN: The north shore has thundering waterfalls and towering cliffs. The fall color under Superior’s stormy weather often yields dramatic images.
West Virginia: Blueberry bushes on the Dolly Sods plateau blaze red in early Oct. Canaan Valley peaks a week or two later. Blackwater Canyon’s mix can’t miss.
Great Smoky Mountains National Park, NC and TN: Some of the finest fall color in the southern U.S., with a dramatic range of elevations for a variety of tree species and peak foliage times.
Blue Ridge Parkway, NC and VA: With 469 miles of mountains, waterfalls, and rolling hills, there’s no end to the photographic possibilities.
Shenandoah National Park, VA: D.C.-area residents are just two hours away from sweeping mountain vistas and bold autumn foliage.
Upper Peninsula, MI: Hot spots include the Porcupine Mountains, Tahquamenon Falls, and south shore of Lake Superior at Pictured Rocks National Lakeshore.

Visit our online store and see some of our autumn photographs and greeting cards!
Appleberry Photography

Thursday, August 22, 2013

How to take an Autumn Photograph!

Autumn is a colorful, special time of the year! Here are tips to take some awesome autumn landscape shots! Courtesy of About.com Please visit our Artfire shop!
APPLEBERRY PHOTOGRAPHY  We have several autumn photographs! Appleberry Photography Ellen

Monday, July 15, 2013

How to photograph on the Beach-New York Institute of Photography

We're in a heatwave!   Many people will be heading to their local beaches to keep cool! Below is
an article that will show you exactly how to capture that perfect beach photo! 


Beach Photography Photo Tips - New York Institute of Photography

Here is an excellent article on photographing on the beach! 

Beach Photo Tips

By NYIP Staff on May 20th, 2012
NYIP - mother and daughter
NYIP - Family at the Beach
What's a beach? To us, it's any sandy stretch on the edge of a lake, a river bank, or the ocean. It's a great place for fun and relaxation, and we hasten to add, a great place to take beach photos‚ anytime! While we have summer's warm and sunny weather and long lazy days in mind as we write this, photography on the beach can give great results any time of the year, in any weather, from sunrise to sunset. Here are some beach photo tips that will yield great results, no matter the season.
© NYI Student David J. Ginther
Typically, you won't need lots of fancy gear when you go to the beach. A point-and-shoot or DSLR with a normal range zoom lens is all you'll need. If you wish, bring along a small flash and a tripod for long exposures.
There are two reasons to keep the gear simple when headed to the beach. First and foremost, we're going to have fun, and packing too much equipment just gets in the way. Second, the sand, sun, surf and salty air creates an environment that can be rough on delicate equipment.
Here are some beach photography tips to help you protect the gear that you do bring.
Everyone knows that salt water and surf are rough on cameras. What most people don't realize is that sand can be the worst enemy of all. Fine sand particles can get inside camera bodies and lens barrels and wreak havoc with your camera's mechanics and optics. While camera manufacturers have made great improvements to camera body seals, there are some common sense beach photo tips for you to try.
© NYI Graduate F.X. Laubscher
There are two principal ways that sand can get into your equipment: Wind and stupidity.
Fine particles blown by the wind cannot be avoided, and in those conditions we suggest you work only with "sealed" cameras, anything from a waterproof disposable model, a point-and-shoot or a DSLR that's in a special waterproof housing or a model that's designed for use underwater.
You may wonder about using "waterproof" cameras out of the water, but they are very good for this purpose. The cameras we're talking about are the generally inexpensive "weatherproof" models or "waterproof" models. They're good for use on the beach and, in some cases, on or near the surface of the water. We're not talking about expensive gear designed for deep scuba diving.
(NYI Director Emeritus Don Sheff, who we note with pride is a Certified Underwater Photographer and veteran diver, reminds us that pressure underwater increases rapidly. Most "waterproof" point-and-shoot cameras can't handle depths greater than 10 or 15 feet. If you want to go deeper, then you'll need either an expensive scuba-housing for your camera, or a specialty scuba camera like the Nikon Nikonos.)
© Chuck DeLaney, NYI Dean
Getting back to the beach, blowing sand is an unavoidable menace, and if you don't have a protected camera, one of the best beach photo tips is to stay away on a windy day. On the other hand, if it's not windy, your regular camera should do if you use it intelligently.
Which brings us to stupidity. Whether it's windy or not, the other way that sand gets into your camera is through carelessness. This includes obvious no-no's like handling the camera with sandy fingers, changing memory cards while your friends are shaking sand out of a blanket, or similar stupidities.
What should you do if, despite your best efforts, some sand does get into your film camera? First, try removing it by using a blower. A rubber bowl blower may suffice. If not, try a compressed air blower. If this doesn't remove all the grains of sand, try Step Two. Gently...GENTLY... use a brush to remove them. A sable or mink brush is best since you don't want to scratch your delicate camera or lens. If brushing doesn't handle the job completely, you're up to Step Three. Even more gently, try to brush away the grains using a microfiber cloth. If you still can't get rid of all the grains of sand, STOP. Bring your camera to a repair shop and let the experts take over.
After sand, heat is the second-most dangerous enemy of your camera when taking beach photos. Heat is hard on cameras and sensitive electronic circuitry. But excess heat is easily avoided. Just keep your equipment out of direct sun. Never let your camera bake in direct sun. Keep it covered and in the shade as much as possible.
© Liz Roberts
© Liz Roberts
The third gremlin on the beach is humid air. In cold weather, the danger is that the camera gets cold outside so that, when it's brought back into the warm humid air in a house, droplets condense on it. In warm weather, surprisingly, the danger is really just the same. Here's why. Often, your camera is cool because it's been stored in a cool air-conditioned car or a cool air-conditioned cabin on a boat. When that cool camera is brought out into the hot humid air of the beach, it too may have droplets condense on it.
© NYI Student David Nicherson
Solution? If your camera is cold, let it adjust to the beach conditions gradually to minimize condensation. In other words, give your digital camera time after you take it out of a cool environment. Never start shooting immediately when you move your camera from a cool-and-dry place to a warm-and-humid place like a beach. Of course, worse than hot, humid air is hot, humid, salty air, the type of air you'll find at an ocean beach in summer. Watch out for salt condensing on your camera ‚ especially on the electronic parts inside your camera. Salt can really damage delicate electronics. What to do? Again, use common sense. If you use a digital camera when taking beach photos, don't open it too often ‚ and shield it from ocean spray when you do. Salt should not get inside. If it does, treat it like sand. Follow these beach photo tips and attempt to blow it out...brush it out...microfiber it out.
NYI - Playing in the Water Finally, the most obvious gremlin. Keep water from striking your camera directly. Do everything you can to prevent water from splashing on your camera, or moist air from blowing into the interior of your camera.
What if your camera gets accidentally soaked? If it gets soaked with plain water, let it dry, and take it to a repair shop. But if it falls into salt water and gets thoroughly immersed, contact a repair shop immediately.
A final word about protecting your equipment during beach photography: We've given you all sorts of warnings, but don't get discouraged. If you use ordinary common sense, you won't be bothered by any of these gremlins and you'll be ready to take great shots at the beach.
Now, you may wonder why we included a strobe in our suggested gear. After all, the sunny beach has too much light, if anything. It usually has direct sunlight. That's why many people go to the beach – to sun themselves. Why would we need a strobe to take beach photos? Because of that direct sun, that's why! The bright sun casts dark shadows. We need the strobe to add light to those shadows. To open them up. To fill them. That's the purpose of the strobe. To act as a fill light.
NYI - Woman on Beach
NYI - Little Girl on Beach
Use fill flash (such as the small built-in flash on your point-and-shoot) to fill in shadows as in these two shots above.
Now that we've covered equipment for beach photography, let's turn to subject matter.
As with all photographs including beach photography, we suggest you keep NYI's Three Guidelines uppermost in your mind when you shoot.
  • Guideline One: What's my subject?
  • Guideline Two: How can I give emphasis to my subject?
  • Guideline Three: How can I simplify my photograph?
Probably the Number One subject on a beach is people. People at rest. People at play. People swimming. People sunning. People sleeping.
NYI - Couple on the Beach
NYI - Family on the Beach
The beach is a powerful backdrop, filled with activity and distraction. To avoid distracting from your subject(s), keep your subject large and up front in your frame. In the NYI Course we have an entire lesson on techniques for drawing attention to your subject.
When you're photographing people on the beach, the biggest danger is squinting. You follow the old Kodak "rule": You set up with the bright sun streaming into the face of your subject from over your shoulder. Forgetting for the moment the problem this creates with dark shadows (which you open up with your fill flash), we think the biggest problem when taking beach photos is that your subject has to squint. And most people don't look their best when squinting. In fact, most people look terrible squinting. How can you avoid this? One of the most obvious beach photo tips is to try moving your subject into the shade‚for example, the shade of an umbrella. Perhaps, wait till a cloud obscures the direct sun. Or turn your subject so that the sun is behind him or her, and use fill flash to light the face. In other words, watch out for squinting and take steps to avoid it!
In beach scenes of people, the second biggest danger is distraction. Here's where simplification comes in. Pay close attention to the background. It's easy to overlook distracting things when you're surrounded by so many interesting sights. Look carefully. If you see distracting elements‚ — trash cans, coolers, misplaced towels, etc., — try to either remove them or change your angle to eliminate them from view.
© NYI Student Maria Teresa Henderson
NYI - Sea gulls and Child
This picture of the girl with the sea gulls (above right) is an example of one that could benefit from a little more simplification. We find those two out-of-focus figures sitting at the water's edge are distracting. The photographer might have eliminated them by finding a slightly better angle.
Children at play are among the best subjects for beach photos. Something about the beach seems to promote kids getting lost in fantasy projects. Don't forget to document the results.
© Chuck DeLaney, NYI Dean
NYI - Family on the Beach
Another common type of beach photo is the scenic shot where you show an entire stretch of beach. It's unusual to get a shot without people so don't even try. In fact, people give a sense of scale to this type of beach photography.
Their activity may even tell a story. Shooting from a high angle may help to capture the sweep of the beach.
Lighting can play a key role in beach photography. We've reminded you in the aforementioned beach photo tips to use fill flash to avoid heavy dark shadows in foreground subjects.
On the other hand, don't rule out using backlighting for dramatic silhouettes including sunset shots.
© Chuck DeLaney, NYI Dean
© NYI Student Duane Cline
Speaking of sunsets, how do you expose for sunsets? There are a number of possibilities. Best is to take an incident reading of the light or a gray-card reading. Either of these should give you right-on exposure since they read the light regardless of the subject and color. For more information about sunsets, read our article, How to PhotographSunsets
NYI - SunsetIf you don't have an incident light meter or a gray card, then take a reading with your built-in meter...and bracket!
What about with a point-and-shoot that's "automatic everything"? Use the exposure-lock button on your point-and-shoot, and take two readings. First, tip the camera down so it "reads" more dark water and less bright sky in the frame. For beach photos you want to press down the exposure-lock button so the camera is fooled into giving more exposure because it thinks the subject is darker than it really is. Shoot the scene using this exposure reading. Second, tilt the camera up toward the sky and lock exposure on that brighter scene. This time, we've fooled the meter into thinking the scene is brighter than it actually is, so there will be less exposure. Shoot this way. When you get back the prints, pick the photo you like best and tell everyone that's exactly the way it looked.
Remember this above all other beach photo tips: you'll get warmer light and long, dramatic shadows when the sun is low in the sky. Filmmakers call it the "magic hour." But overcast days and open shadows can make interesting photos as well. Let your imagination run wild.
© NYI Student Albert D. Arauz
NYI - Couple on the Beach
So, now that you've read our beach photography tips, toss your favorite camera into your beach bag, along with your strobe, and get to work on those beach photos. Don't forget the "he-man" subject but watch out for nasty shadows like this one on the right. It's easy to fix, just yell: "Yo, Tarzan, stop straining and lift your fat head and look into the camera!" And get ready to run fast before he has a chance to come over and kick sand in your face.

Thursday, July 11, 2013

How to photograph pets, cats and dogs!

This is another awesome article on pet photography!


How to Photograph Pets

This article focuses primarily on dogs and cats, and should be read in conjunction with my other articles "the basic principles of lighting", and "framing the subject"

Lighting

Correctly lighting an animal requires a slightly different approach to lighting a human subject; fur does not reflect light in the same way as skin. The exact position of the main light source and level of modelling is subordinate to the need to capture texture (e.g. their noses do not cast shadows on their faces). The main light source still needs to fall from above and to one side, but the exact angle of the light is less critical, and stronger and more direct illumination can and should be used.

I recommend the use of flash light combined with good daylight to make fur shine. Cats and dogs do not appear to be aware of flash light, nor worried by it. There are however, two potential problems to avoid: "red-eye" and "black halo".

Red-eye is caused by the reflection of light from the retina of the eye. This can be minimised by using an off-camera flash (if you have one), positioned slightly above, below, and/or to one side of the axis of the camera. Most modern cameras with built-in flash units have a red-eye reduction mode. This uses a series of pre-exposure flashes to close the subject's iris. The use of flash as a fill-in with bright daylight also minimises red-eye.

Black-halo is the hard shadow cast by the use of flash in low light conditions. The way to avoid this is to ensure that the flash isn't the main (brightest) light source.

Exposure and focus (dark subjects)

Modern cameras are fully automatic in this respect, but most do not perform well when the subject is something like a black dog. I use an expensive Leica, but it still underexposes, and hunts for a focus lock when photographing my (black) dogs.

If your camera has a spot metering facility, use it. If you have a manual override capability, try "bracketing" (i.e. repeat each shot and deliberately over expose). If you have control over shutter speeds, use a fast setting. Similarly, if your camera allows manual focusing, try doing this yourself.
  

 Underexposure can be corrected using Photoshop (etc), provided that the lighting was more or less right (i.e. under exposure due to backlighting cannot be corrected).

Poor focus cannot be corrected retrospectively.


 Correct Angle
 
The height from which the photograph is shot is very important. Too often I see aerial shots of small dogs and cats photographed by their towering 6-foot owner. The simple rule is - try to get the camera on the same level as the subject.

With cats and smaller dogs, it can be easier to place them on a table or any other suitable item of furniture or support. Sometimes you have to get down on the floor, but many animals will think you are playing a game.

Encouraging co-operation

The hardest part of pet portrait photography is getting the subject's co-operation.

The pet owner should know the best way to accomplish this; the place in which their pet is most likely to feel comfortable, whether they are more amenable before or after feeding/exercise, what commands or noises they will respond to.

My personal tips are:-

1. If possible, work in the place and at a time that best suits the pet.

2. Leave the commands/noises to one person, preferably the photographer. There is nothing worse than instructions coming from all around the animal.

3. Don't dangle food/toys in front of the subject - they will inevitably move to get them.

4. One way of getting pets to stay still for a few seconds is to rub something tasty on their jaws. They will almost certainly stop to lick their lips.

Posing the subject

If your dog has been trained to sit or stand, that can be very helpful, but mostly, you will need to be very patient and wait for the required pose to happen.

With male dogs, watch-out for "things popping out", and reposition if it does.

Don't photograph cats lying down. They often tuck their legs under their bodies, which results in the overall body shape becoming little more than a fury blob.

Be objective; it's too easy to see nothing more than the pet you love, and overlook the fact that the shot you are about to take is dull. 


Author:  John Burton

Portrait artist working mainly from clients' own photographs.

Sunday, July 7, 2013

How to photograph animals

Continuing with the subject of photographing animals, here is an excellent article by the staff of the New York Institute of Photography;


Pet Photography 101

Seven Habits of the Successful Pet Photographer

Whether they're cute or ferocious, you want to immortalize your family pet on film. Don't worry if your Beagle, Siamese, or Iguana is camera shy, these little devils can't escape NYI photographers! We are here to help you with our Seven Habits of the Successful Pet Photographer. So fluff up your Persian and let's get started!

1. Get inside your pet's brain.

For a portrait, you want your four-legged buddy to feel at ease so why not try to contain him or her in their favorite hang out-be it the rocking chair on the front porch, the stoop, on top of the fridge, or on top of your desk. Many cats like to rest on top of reading material, not for the intellectual stimulation, but to prevent their masters from reading so that they can get all the attention.
© Student Carolyn Sauer You should always respect your pet's personality when taking a photo just as you would for a human subject. Here's an ethical question for you. Should pet owners resist the urge of draping them in Versace? Does this really humiliate the animal? Well, we should probably leave that for your local pet psychic to answer. Chances are, though, if you dress your Saint Bernard up in red raincoat and booties, you're not going to get a natural expression. We leave this to your discretion. The NYI staff has fallen in love with this photo taken by NYI Student Carolyn Sauer of this poodle in his pink tutu. We suspect that this puppy was begging for treats and oblivious to her ballerina get-up. By the way, take a look at this puppy's feet – in first position of ballet!

2. Thou Shalt Tell A Story.

© Student Wayne Barber See this cat behind the screen looking out? We can imagine the story behind this photo. It is a look that cat owners will recognize – that hypnotic stare that a cat gets when it intently studies a feathered object that it would like to nibble on. Next time you see a photo of a pet, see if it tells a story. It doesn't have to be a long story. It can be a short story as in this poodle in the pink tutu. Let's say you're trying to take a photo of your golden retriever and in walks your toddler with an ice cream cone and your golden retriever then knocks the cone out of his hands. The end result will be a photo that speaks for itself!
It's a good idea to have your camera at a central location in your home so you can grab it the second you see an animal story.
© Student Charles Khun

3. Be prepared for sudden movement.

Pets can be unpredictable and move without warning. Consider your photo session a jungle safari of sorts and prepare for the cheetah's sudden escape. Sometimes pets can be restless and jump at the sound of a shutter click, so you should adjust your camera accordingly. Set your shutter speed at about 1/125th so your tabby doesn't come across as one big orange fuzz ball. With film use a high speed such as ISO 400 or 800 film if you are going to be photographing indoors with minimal available light.
Pets can be just as vain as their masters. You can make a shiny coat of fur look even better by using a soft light or catching your pet taking a late afternoon sunbath.

4. Control the clutter on the set.

Though you will not have to deal with the model's ill-coordinated clothing, you still don't want to photograph your Dalmatian against a drab shower curtain.
Remember, follow your pet's thought process – eat, sleep, play – in other words – simplify! Once you decide on the location of your photo session, if it is indoors remember to get rid of clutter – stray magic markers, dirty socks, human limbs, TV Guides – things that distract and do not add to the story behind the photo. Outdoors, watch out for lawn furniture, stray toys and other debris that can complicate your background.
This brings us to our fifth Habit.
© Student Larysa Y. Petlina

5. Consider your camera angle.

It's a good idea to place the camera at about the same level of the animal. This will fill your frame with your furry subject. If you're outdoors and your subject is digging for treasures or eating your neighbor's tulips, get down in the dirt so you can be at the same level. Seeing the subject's point of view, can give you an extra creative spark which will lead to better photographs.
© Student Patricia L. Fiedler If you are aiming for a glamorous close-up shot as in NYI Student Patricia Fielder's photo of her cat, you will want to use a close-up lens and be very quiet so you don't interrupt kitty's trance. Oh, what beautiful fur this cat has! A pet photograph doesn't always do justice to the subject's fur.

6. Don't forget the treats and the props!

© Student Murnice Kuesel Treats are tools of the trade in pet photography. If you know your pet has a weakness for...say carrot cake, liverwurst, or peanut butter, do not be afraid to use these to help you take that unforgettable shot. This can work especially well when photographing people with pets. (Though, you may want to get your vet's approval for the peanut butter.) If you want to have a great portrait of your child and pet, try getting the child and the pet to look in the same direction. Make sure the child is comfortable with the pet and vice versa. The child can cuddle the animal if it is small enough or stroke it if the animal towers over the child. It probably isn't a good idea to have the child play rodeo and ride it around the living room. The trick is to show the relationship between the pet and the person in the picture.
In NYI's Lesson on Child Photography and Pet Photography, we offer this inside tip: If you want two animals to "cuddle," try rubbing some food behind the ear of one of them – then be prepared to shoot fast! If you are shooting a group of puppies or kittens, think about placing them in one place – a basket, sink, tub, or mailbox so you can contain in one area.
© Student Suzy Maynard Make that tuna frosting, please! As you can see from this cute birthday party photo, props can really help your create a great photo. NYI Student Suzy Maynard of Pennsylvania took this photo. I think the cats were so preoccupied with the food, that they don't seem to be bothered a bit by the silly birthday hats and cat sized cups.

7. Study your pet during the day.

© Student Judy L. Smith What sets him apart from other animals? What weird habits does he have? If you were to interview one hundred cat owners, they would surely come up with one hundred different activities their cats like to do besides snoozing. Some cats like to wrestle with stuffed animals, chase flies, and lick the spaghetti pot. If you want to take a funny photograph, the key is in the behavior. Aside from their life of luxury (sleeping, chasing ghosts and shadows, and eating), what do they do to entertain themselves? Do they adopt the same habits and patterns of behavior as their master's?
Even though seeing pets dressed up in clothes, leather jackets, tutus, is cute some of the best photographs can be taken when the pet is oblivious to the camera-when you catch the animal's expression or when the animal has almost a human expression. Another approach to pet photography is to take a photo of your pet when he isn't looking. I suppose some animal activists may think this encroaches on the animal's privacy, but even such high profile pets like Barney, President Bush's dog, or Socks, the former White House cat have learned to live with their in-house photographer!

Tips for photographing reptiles, birds and other caged friends:

If your pet spends most of his life behind bars, it certainly makes sense to let him out for the photo shoot! Your Iguana will look much better lounging around the backyard than napping in a cage.
© Instructor Phil Mansfield Snakes and other reptiles – If your significant other doesn't want to pose with this snake a la Natasha Kinski, there are plenty of other ways to photograph a snake. Be inventive! You can get a close up shot of the snake's face and eyes or put him on a table and photograph him from different angles. You can also experiment by placing your pet in an environment that is foreign to your pet. For example, you could place your pet frog on a satin pillow for a contrast in texture. Who knows? The frog might like it.
Birds – If you have trained Polly to rest on your finger then you shouldn't have a problem getting her to pose. Chances are your feathered creature is very colorful. Use this physical attribute to your best advantage. Make sure that your background does not clash with his colors. Make sure the background isn't too busy. Keep it simple; stick to solid crisp colors.
Fish – We did not want to leave out the goldfish groupies among you! If you want to take a good photo of your fish tank, follow these rules:
© Instructor Phil Mansfield If you are not going to be using your flash, your best bet is to put your camera lens against the fish tank and wait for the fish to swim your way. The light from the aquarium will brighten your subject. If you are intent on using a flash, be sure to take the photo from an angle, a 60-degree angle is fine, so that you do not get a blinding hot spot.
Now that you know how to take great photos of your pampered pet, we wish you a good scratch-free photo session!

-Staff of the New York Institute of Photography


This is one of my favorite animal photographs!